Python并行编程
- 本书说明
- 1 认识并行计算和Python
- 1.1 介绍
- 1.2 并行计算的内存架构
- 1.3 内存管理
- 1.4 并行编程模型
- 1.5 如何设计一个并行程序
- 1.6 如何评估并行程序的性能
- 1.7 介绍Python
- 1.8 并行世界的Python
- 1.9 介绍线程和进程
- 1.10 开始在Python中使用进程
- 1.11 开始在Python中使用线程
- 2 基于线程的并行
- 2.1 介绍
- 2.2 使用Python的线程模块
- 2.3 如何定义一个线程
- 2.4 如何确定当前的线程
- 2.5 如何实现一个线程
- 2.6 使用Lock进行线程同步
- 2.7 使用RLock进行线程同步
- 2.8 使用信号量进行线程同步
- 2.9 使用条件进行线程同步
- 2.10 使用事件进行线程同步
- 2.11 使用with语法
- 2.12 使用 queue 进行线程通信
- 2.13 评估多线程应用的性能
- 3 基于进程的并行
- 3.1 介绍
- 3.2 如何产生一个进程
- 3.3 如何为一个进程命名
- 3.4 如何在后台运行一个进程
- 3.5 如何杀掉一个进程
- 3.6 如何在子类中使用进程
- 3.7 如何在进程之间交换对象
- 3.8 进程如何同步
- 3.9 如何在进程之间管理状态
- 3.10 如何使用进程池
- 3.11 使用Python的mpi4py模块
- 3.12 点对点通讯
- 3.13 避免死锁问题
- 3.14 集体通讯:使用broadcast通讯
- 3.15 集体通讯:使用scatter通讯
- 3.16 集体通讯:使用gather通讯
- 3.17 使用Alltoall通讯
- 3.18 简化操作
- 3.19 如何优化通讯
- 4 异步编程
- 4.1 介绍
- 4.2 使用Python的 concurrent.futures 模块
- 4.3 使用Asyncio管理事件循环
- 4.4 使用Asyncio管理协程
- 4.5 使用Asyncio控制任务
- 4.6 使用Asyncio和Futures
- 5 分布式Python编程
- 5.1 介绍
- 5.2 使用Celery实现分布式任务
- 5.3 如何使用Celery创建任务
- 5.4 使用SCOOP进行科学计算
- 5.5 通过 SCOOP 使用 map 函数
- 5.6 使用Pyro4进行远程方法调用
- 5.7 使用 Pyro4 链接对象
- 5.8 使用Pyro4部署客户端-服务器应用
- 5.9 PyCSP和通信顺序进程
- 5.10 使用Disco进行MapReduce
- 5.11 使用RPyC远程调用
- 6 Python GPU编程
如何优化通讯
拓扑是 MPI
提供的一个有趣功能。如前所述,所有通信功能(点对点或集体)都是指一组进程。我们一直使用包含所有进程的
MPI_COMM_WORLD 组。它为大小为n的通信组的每个进程分配 0 - n-1
的一个rank。但是,MPI允许我们为通信器分配虚拟拓扑。它为不同的进程定义了特定的标签分配。这种机制可以提高执行性能。实际上,如果构建虚拟拓扑,那么每个节点将只与其虚拟邻居进行通信,从而优化性能。
例如,如果排名是随机分配的,则消息可能会在到达目的地之前被迫传递给许多其他节点。除了性能问题之外,虚拟拓扑还可确保代码更清晰可读。 MPI提供两种建筑拓扑。第一个构造创建笛卡尔拓扑,而后者可以创建任何类型的拓扑。具体来说,在第二种情况下,我们必须提供要构建的图形的邻接矩阵。我们将只处理笛卡尔拓扑,通过它可以构建多种广泛使用的结构:网格,环形,环形等等。用于创建笛卡尔拓扑的函数如下所示: :
comm.Create_cart((number_of_rows,number_of_columns))这里, number_of_rows 和 number_of_columns 指定了栅格的行列数。
如何做
在下面的例子中,我们将展示如何实现一个 M x N 的笛卡尔拓扑。同时,我们也定义了一系列坐标展示进程是如何操作的: :
from mpi4py import MPI
import numpy as np
UP = 0
DOWN = 1
LEFT = 2
RIGHT = 3
neighbour_processes = [0,0,0,0]

if __name__ == "__main__":
    comm = MPI.COMM_WORLD
    rank = comm.rank
    size = comm.size
    grid_rows = int(np.floor(np.sqrt(comm.size)))
    grid_column = comm.size // grid_rows
    if grid_rows*grid_column > size:
        grid_column -= 1
    if grid_rows*grid_column > size:
        grid_rows -= 1
    if (rank == 0) :
        print("Building a %d x %d grid topology:" % (grid_rows, grid_column) )
    cartesian_communicator = comm.Create_cart( (grid_rows, grid_column), periods=(True, True), reorder=True)
    my_mpi_row, my_mpi_col = cartesian_communicator.Get_coords( cartesian_communicator.rank )
    neighbour_processes[UP], neighbour_processes[DOWN] = cartesian_communicator.Shift(0, 1)
    neighbour_processes[LEFT], neighbour_processes[RIGHT] =  cartesian_communicator.Shift(1, 1)
    print ("Process = %s row = %s column = %s ----> neighbour_processes[UP] = %s neighbour_processes[DOWN] = %s neighbour_processes[LEFT] =%s neighbour_processes[RIGHT]=%s" % (
    rank, my_mpi_row, my_mpi_col,neighbour_processes[UP],
    neighbour_processes[DOWN], neighbour_processes[LEFT],
    neighbour_processes[RIGHT]))
运行以上代码得到的结果如下: :
C:\>mpiexec -n 4 python virtualTopology.py
Building a 2 x 2 grid topology:
Process = 0 row = 0 column = 0 ---->
neighbour_processes[UP] = -1
neighbour_processes[DOWN] = 2
neighbour_processes[LEFT] =-1
neighbour_processes[RIGHT]=1
Process = 1 row = 0 column = 1 ---->
neighbour_processes[UP] = -1
neighbour_processes[DOWN] = 3
neighbour_processes[LEFT] =0
neighbour_processes[RIGHT]=-1
Process = 2 row = 1 column = 0 ---->
neighbour_processes[UP] = 0
neighbour_processes[DOWN] = -1
neighbour_processes[LEFT] =-1
neighbour_processes[RIGHT]=3
Process = 3 row = 1 column = 1 ---->
neighbour_processes[UP] = 1
neighbour_processes[DOWN] = -1
neighbour_processes[LEFT] =2
neighbour_processes[RIGHT]=-1
对于每一个进程,输出结果都是:如果 neighbour_processes = -1
,那么没有临近的拓扑,否则, neighbour_processes 显示最近的进程。
讨论
最后的拓扑是 2x2 的网状结构,大小为4,和进程数一样: :
grid_rows = int(np.floor(np.sqrt(comm.size)))
grid_column = comm.size // grid_rows
if grid_rows*grid_column > size:
    grid_column -= 1
if grid_rows*grid_column > size:
    grid_rows -= 1
然后,建立笛卡尔拓扑: :
cartesian_communicator = comm.Create_cart( (grid_rows, grid_column), periods=(True, True), reorder=True)通过 Get_coords() 方法,我们可以确定一个进程的坐标: :
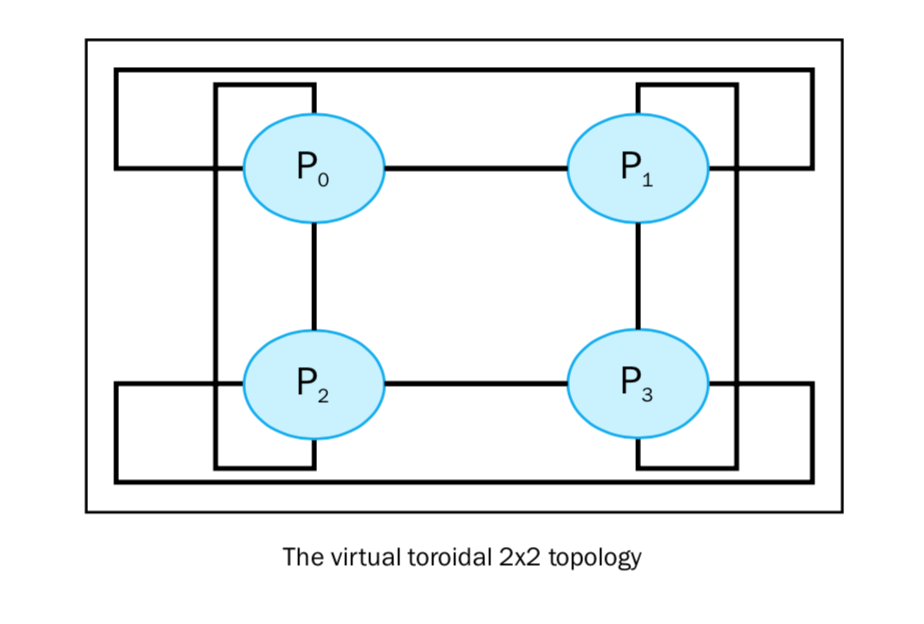
my_mpi_row, my_mpi_col = cartesian_communicator.Get_coords( cartesian_communicator.rank )上面的拓扑可以用下图表示:

了解更多
如果要得到一个 M x N 的环形拓扑,我们需要如下代码: :
cartesian_communicator = comm.Create_cart( (grid_rows, grid_column), periods=(True, True), reorder=True)输入将如下所示: :
C:\>mpiexec -n 4 python VirtualTopology.py
Building a 2 x 2 grid topology:
Process = 0 row = 0 column = 0 ---->
neighbour_processes[UP] = 2
neighbour_processes[DOWN] = 2
neighbour_processes[LEFT] =1
neighbour_processes[RIGHT]=1
Process = 1 row = 0 column = 1 ---->
neighbour_processes[UP] = 3
neighbour_processes[DOWN] = 3
neighbour_processes[LEFT] =0
neighbour_processes[RIGHT]=0
Process = 2 row = 1 column = 0 ---->
neighbour_processes[UP] = 0
neighbour_processes[DOWN] = 0
neighbour_processes[LEFT] =3 neighbour_processes[RIGHT]=3
Process = 3 row = 1 column = 1 ---->
neighbour_processes[UP] = 1
neighbour_processes[DOWN] = 1
neighbour_processes[LEFT] =2
neighbour_processes[RIGHT]=2
拓扑图形如下所示:
